Zero-downtime collection migration with aliases
In this tutorial, we will explore how to use collection aliases in Weaviate to perform zero-downtime migrations. Collection aliases are alternative names for Weaviate collections that allow you to reference a collection by multiple names. This powerful feature enables you to migrate to new collection schemas, update configurations, or reorganize your data without any service interruption.
Prerequisites
Section titled “Prerequisites”Before starting this tutorial, ensure you have the following:
- An instance of Weaviate (e.g. on Weaviate Cloud, or locally), version
v1.32or newer. - Your preferred Weaviate client library installed.
- Basic familiarity with Weaviate collections and data import.
Introduction
Section titled “Introduction”Traditional collection migrations require significant downtime. The typical workflow involves:
- Creating a new collection
- Stopping your application
- Migrating data
- Updating all collection references in your code
- Restarting your application
This process causes service interruption and requires code changes. With aliases, you can eliminate both issues.
What are collection aliases?
Section titled “What are collection aliases?”A collection alias is a pointer to an underlying collection. When you query using an alias, Weaviate automatically routes the request to the target collection. Think of it like a symbolic link in a file system or a DNS alias for a website.
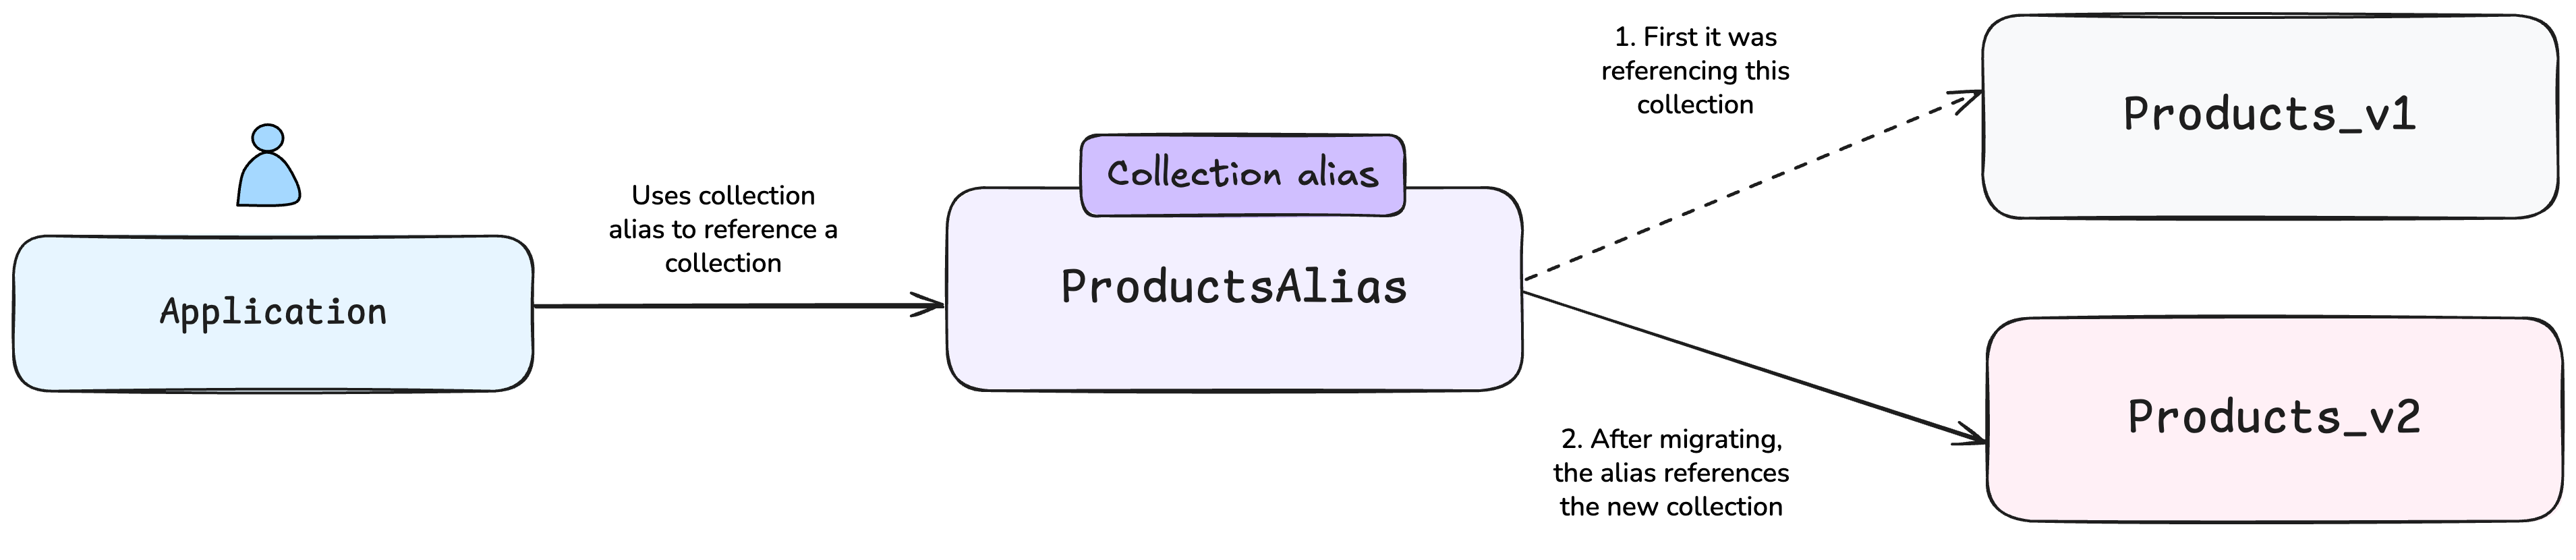
Collection aliases are ideal for schema migrations (updating properties or vectorization settings), A/B testing, and disaster recovery. They add minimal routing overhead and enable instant switching between collection versions without code changes.
How aliases enable zero-downtime migration
Section titled “How aliases enable zero-downtime migration”Aliases allow you to keep your application code unchanged as it references the stable alias name. You can switch between collections instantly and roll back quickly if needed.
The migration process becomes:
- Create a new collection with updated schema
- Migrate data (while the old collection serves traffic)
- Update the alias to point to the new collection (instant switch)
- Delete the old collection after verification
Tutorial: Migrating a products collection
Section titled “Tutorial: Migrating a products collection”Let's walk through a complete migration scenario where we need to add a new field to an existing collection of products.
Step 1: Connect to Weaviate
Section titled “Step 1: Connect to Weaviate”First, connect to your Weaviate instance using your preferred client library.
# Connect to local Weaviate instance
client = weaviate.connect_to_local()// Connect to local Weaviate instance
const client: WeaviateClient = await weaviate.connectToLocal()// Connect to local Weaviate instance
config := weaviate.Config{
Scheme: "http",
Host: "localhost:8080",
}
client, err := weaviate.NewClient(config)
require.NoError(t, err)// Connect to local Weaviate instance
client = WeaviateClient.connectToLocal();// Connect to local Weaviate instance
client = await Connect.Local();Step 2: Create the original collection
Section titled “Step 2: Create the original collection”Let's create our initial products collection and populate it with data.
# Create original collection with data
client.collections.create(
    name="Products_v1", vector_config=wvc.config.Configure.Vectors.self_provided()
)

products_v1 = client.collections.use("Products_v1")
products_v1.data.insert_many(
    [{"name": "Product A", "price": 100}, {"name": "Product B", "price": 200}]
)// Create original collection with data
await client.collections.create({
name: "Products_v1",
vectorizers: weaviate.configure.vectors.selfProvided()
})
const products_v1 = client.collections.use("Products_v1")
await products_v1.data.insertMany([
{ "name": "Product A", "price": 100 },
{ "name": "Product B", "price": 200 }
])// Create original collection with data
err := client.Schema().ClassCreator().WithClass(&models.Class{
Class: "Products_v1",
Vectorizer: "none",
}).Do(ctx)
require.NoError(t, err)
// Insert data into Products_v1
objects := []*models.Object{
{
Class: "Products_v1",
Properties: map[string]interface{}{
"name": "Product A",
"price": 100,
},
},
{
Class: "Products_v1",
Properties: map[string]interface{}{
"name": "Product B",
"price": 200,
},
},
}
_, err = client.Batch().ObjectsBatcher().
WithObjects(objects...).
Do(ctx)
require.NoError(t, err)// Create original collection with data
client.collections.create("Products_v1", col -> col.vectorConfig(VectorConfig.selfProvided())
.properties(Property.text("name"), Property.number("price")));
var productsV1 = client.collections.use("Products_v1");
productsV1.data.insertMany(Map.of("name", "Product A", "price", 100.0),
Map.of("name", "Product B", "price", 200.0));// Create original collection with data
await client.Collections.Create(
new CollectionCreateParams
{
Name = ProductsV1,
VectorConfig = Configure.Vector("default", v => v.Text2VecTransformers()),
}
);
var productsV1 = client.Collections.Use(ProductsV1);
// Batch insert works best with anonymous objects here
await productsV1.Data.InsertMany(
new[]
{
new { name = "Product A", price = 100 },
new { name = "Product B", price = 200 },
}
);Step 3: Create an alias for production access
Section titled “Step 3: Create an alias for production access”Now create an alias that your application will use. This decouples your application code from the specific collection version.
# Create alias pointing to current collection
client.alias.create(alias_name="ProductsAlias", target_collection="Products_v1")// Create alias pointing to current collection
await client.alias.create({
alias: "ProductsAlias",
collection: "Products_v1"
})// Create alias pointing to current collection
err = client.Alias().AliasCreator().WithAlias(&alias.Alias{
Alias: "Products",
Class: "Products_v1",
}).Do(ctx)
require.NoError(t, err)// Create alias pointing to current collection
client.alias.create("Products_v1", "ProductsAlias");// Create alias pointing to current collection
await client.Alias.Create(ProductsAlias, ProductsV1);Step 4: Use the alias in your application
Section titled “Step 4: Use the alias in your application”Your application code should reference the alias, not the underlying collection. This ensures it continues working regardless of which collection version is active.
# Your application always uses the alias name "Products"
products = client.collections.use("ProductsAlias")

# Insert data through the alias
products.data.insert({"name": "Product C", "price": 300})

# Query through the alias
results = products.query.fetch_objects(limit=5)
for obj in results.objects:
print(f"Product: {obj.properties['name']}, Price: ${obj.properties['price']}")// Your application always uses the alias name "Products"
const prods = client.collections.use("ProductsAlias");
// Insert data through the alias
await prods.data.insert({ name: "Product C", price: 300 });
// Query through the alias
const res = await prods.query.fetchObjects({ limit: 5 });
for (const obj of res.objects) {
console.log(`Product: ${obj.properties.name}, Price: $${obj.properties.price}`);
}// Your application always uses the alias name "Products"
// Insert data through the alias
_, err = client.Data().Creator().WithClassName("Products").WithProperties(map[string]interface{}{
"name": "Product C",
"price": 300,
}).Do(ctx)
require.NoError(t, err)
// Query through the alias
resp, err := client.Data().ObjectsGetter().WithClassName("Products").WithLimit(5).Do(ctx)
require.NoError(t, err)
for _, obj := range resp {
props := obj.Properties.(map[string]interface{})
t.Logf("Product: %v, Price: $%v", props["name"], props["price"])
}// Your application always uses the alias name
CollectionHandle<Map<String, Object>> products = client.collections.use("ProductsAlias");
// Insert data through the alias
products.data.insert(Map.of("name", "Product C", "price", 300.0));
// Query through the alias
var results = products.query.fetchObjects(q -> q.limit(5));
for (var obj : results.objects()) {
System.out.printf("Product: %s, Price: $%.2f\n", obj.properties().get("name"),
obj.properties().get("price"));
}// Your application always uses the alias name "Products"
var products = client.Collections.Use(ProductsAlias);
// Insert data through the alias
await products.Data.Insert(new { name = "Product C", price = 300 });
// Query through the alias
var results = await products.Query.FetchObjects(limit: 5);
foreach (var obj in results.Objects)
{
Console.WriteLine(
$"Product: {obj.Properties["name"]}, Price: ${obj.Properties["price"]}"
);
}The key point is that your application code doesn't need to know whether it's accessing Products_v1 or Products_v2 - it just uses the stable alias name.
Step 5: Create the new collection with updated schema
Section titled “Step 5: Create the new collection with updated schema”Now let's create a new version of the collection with an additional field (e.g., adding a category property).
# Create new collection with updated schema
client.collections.create(
    name="Products_v2",
    vector_config=wvc.config.Configure.Vectors.self_provided(),
    properties=[
        wvc.config.Property(name="name", data_type=wvc.config.DataType.TEXT),
        wvc.config.Property(name="price", data_type=wvc.config.DataType.NUMBER),
        wvc.config.Property(
            name="category", data_type=wvc.config.DataType.TEXT
        ),  # New field
    ],
)// Create new collection with updated schema
await client.collections.create({
name: "Products_v2",
vectorizers: weaviate.configure.vectors.selfProvided(),
properties: [
{ name: "name", dataType: weaviate.configure.dataType.TEXT },
{ name: "price", dataType: weaviate.configure.dataType.NUMBER },
{ name: "category", dataType: weaviate.configure.dataType.TEXT }, // New field
],
})// Create new collection with updated schema
err = client.Schema().ClassCreator().WithClass(&models.Class{
Class: "Products_v2",
Vectorizer: "none",
Properties: []*models.Property{
{Name: "name", DataType: schema.DataTypeText.PropString()},
{Name: "price", DataType: schema.DataTypeNumber.PropString()},
{Name: "category", DataType: schema.DataTypeText.PropString()}, // New field
},
}).Do(ctx)
require.NoError(t, err)// Create new collection with updated schema
client.collections.create("Products_v2", col -> col.vectorConfig(VectorConfig.selfProvided())
.properties(Property.text("name"), Property.number("price"), Property.text("category") // New field
));// Create new collection with updated schema
await client.Collections.Create(
new CollectionCreateParams
{
Name = ProductsV2,
VectorConfig = Configure.Vector("default", v => v.SelfProvided()),
Properties =
[
Property.Text("name"),
Property.Number("price"),
Property.Text("category"), // New field
],
}
);Step 6: Migrate data to the new collection
Section titled “Step 6: Migrate data to the new collection”Copy data from the old collection to the new one, adding default values for new fields or transforming data as needed.
# Migrate data to new collection
products_v2 = client.collections.use("Products_v2")
old_data = products_v1.query.fetch_objects().objects

for obj in old_data:
    products_v2.data.insert(
        {
            "name": obj.properties["name"],
            "price": obj.properties["price"],
            "category": "General",  # Default value for new field
        }
)// Migrate data to new collection
const products_v2 = client.collections.use("Products_v2")
const oldData = (await products_v1.query.fetchObjects()).objects
for (const obj of oldData) {
await products_v2.data.insert({
"name": obj.properties["name"],
"price": obj.properties["price"],
"category": "General", // Default value for new field
})
}// Migrate data to new collection
oldData, err := client.Data().ObjectsGetter().
WithClassName("Products_v1").
Do(ctx)
require.NoError(t, err)
for _, obj := range oldData {
props := obj.Properties.(map[string]interface{})
_, err = client.Data().Creator().
WithClassName("Products_v2").
WithProperties(map[string]interface{}{
"name": props["name"],
"price": props["price"],
"category": "General", // Default value for new field
}).Do(ctx)
require.NoError(t, err)
}// Migrate data to new collection
var productsV2 = client.collections.use("Products_v2");
var oldData = productsV1.query.fetchObjects(c -> c.limit(10)).objects();
List<Map<String, Object>> migratedObjects = new ArrayList<>();
for (var obj : oldData) {
migratedObjects.add(Map.of("name", obj.properties().get("name"), "price",
obj.properties().get("price"), "category", "General" // Default value for new field
));
}
productsV2.data.insertMany(migratedObjects.toArray(new Map[0]));// Migrate data to new collection
var productsV2 = client.Collections.Use(ProductsV2);
var oldData = (await productsV1.Query.FetchObjects()).Objects;
foreach (var obj in oldData)
{
// Convert property values to primitives (string, double, etc.) explicitly.
await productsV2.Data.Insert(
new
{
name = obj.Properties["name"].ToString(),
price = Convert.ToDouble(obj.Properties["price"].ToString()),
category = "General",
}
);
}Step 7: Update the alias (instant switch)
Section titled “Step 7: Update the alias (instant switch)”This is the magic moment - update the alias to point to the new collection. This switch is instantaneous, and all queries using the ProductsAlias alias now access the new collection.
# Switch alias to new collection (instant switch!)
client.alias.update(alias_name="ProductsAlias", new_target_collection="Products_v2")

# All queries using "Products" alias now use the new collection
products = client.collections.use("ProductsAlias")
result = products.query.fetch_objects(limit=1)
print(result.objects[0].properties) # Will include the new "category" field// Switch alias to new collection (instant switch!)
await client.alias.update({
alias: "ProductsAlias",
newTargetCollection: "Products_v2"
})
// All queries using "ProductsAlias" alias now use the new collection
const products = client.collections.use("ProductsAlias")
const result = await products.query.fetchObjects({ limit: 1 })
console.log(result.objects[0].properties) // Will include the new "category" field// Switch alias to new collection (instant switch!)
err = client.Alias().AliasUpdater().WithAlias(&alias.Alias{
Alias: "Products",
Class: "Products_v2",
}).Do(ctx)
require.NoError(t, err)
// All queries using "Products" alias now use the new collection
result, err := client.Data().ObjectsGetter().
WithClassName("Products").
WithLimit(1).
Do(ctx)
require.NoError(t, err)
if len(result) > 0 {
fmt.Printf("%v\n", result[0].Properties) // Will include the new "category" field
}// Switch alias to new collection (instant switch!)
client.alias.update("ProductsAlias", "Products_v2");
// All queries using "Products" alias now use the new collection
products = client.collections.use("ProductsAlias");
var result = products.query.fetchObjects(q -> q.limit(1));
System.out.println(result.objects().get(0).properties()); // Will include the new "category" field// Switch alias to new collection (instant switch!)
await client.Alias.Update(aliasName: ProductsAlias, targetCollection: ProductsV2);
// All queries using "Products" alias now use the new collection
products = client.Collections.Use(ProductsAlias);
var result = await products.Query.FetchObjects(limit: 1);
// Will include the new "category" field
Console.WriteLine(JsonSerializer.Serialize(result.Objects.First().Properties));Step 8: Verify and clean up
Section titled “Step 8: Verify and clean up”After verifying that everything works correctly with the new collection, you can safely delete the old one.
# Clean up old collection after verification
client.collections.delete("Products_v1")// Clean up old collection after verification
await client.collections.delete("Products_v1")// Clean up old collection after verification
err = client.Schema().ClassDeleter().WithClassName("Products_v1").Do(ctx)// Clean up old collection after verification
client.collections.delete("Products_v1");// Clean up old collection after verification
await client.Collections.Delete(ProductsV1);Summary
Section titled “Summary”This tutorial demonstrated how to use collection aliases in Weaviate for zero-downtime migrations. Key takeaways:
- Aliases are pointers to collections that enable instant switching between versions
- Zero downtime is achieved by preparing the new collection while the old one serves traffic
- Application code remains unchanged when using aliases instead of direct collection names
- Rollback is simple - just point the alias back to the previous collection
Collection aliases are essential for production Weaviate deployments where uptime is critical. They enable confident migrations, A/B testing, and flexible deployment strategies without service interruption.
Further resources
Section titled “Further resources”Questions and feedback
Section titled “Questions and feedback”Have a question or feedback? Here's how to reach us.